Nice little article for pseudo terminal can be found on below link.
http://www.cyberciti.biz/tips/howto-linux-increase-pty-session.html
Thursday, December 15, 2011
Thursday, December 8, 2011
Network monitoring with vnstat.
vnstat tool is use to monitor network traffic live / hourly/daily/weekly /monthly.
This is useful for linux network monitoring.
this is console based monitoring tool but GUI can also be configured with the help of PHP server.
Ref: http://humdi.net/vnstat/
Let us monitor one fo the server.
After installing the correct rpm .
First update the vnstat for specific port(In my case i wanted to monitor eth0)
vnstat -u -i eth0
once you update the database
just run the command press ctrl-c to stop ,this will produce the network traffic summery for specified interface.
# vnstat -l -i eth0
Monitoring eth0... (press CTRL-C to stop)
rx: 44 kbit/s 23 p/s tx: 132 kbit/s 19 p/s
eth0 / traffic statistics
rx | tx
--------------------------------------+------------------
bytes 1.35 MiB | 1.66 MiB
--------------------------------------+------------------
max 224 kbit/s | 368 kbit/s
average 48.03 kbit/s | 58.77 kbit/s
min 20 kbit/s | 0 kbit/s
--------------------------------------+------------------
packets 5332 | 4217
--------------------------------------+------------------
max 133 p/s | 127 p/s
average 23 p/s | 18 p/s
min 4 p/s | 1 p/s
--------------------------------------+------------------
time 3.85 minutes
Tuesday, December 6, 2011
rpm rebuild
Most of the time you are not able to run any rpm queries such as\
rpm -qa
it just stuck after giving the command.
Well this comes to your rescue.
http://www.cyberciti.biz/tips/rebuilding-corrupted-rpm-database.html
rpm -qa
it just stuck after giving the command.
Well this comes to your rescue.
http://www.cyberciti.biz/tips/rebuilding-corrupted-rpm-database.html
Sunday, December 4, 2011
Install New Network Driver using YUM
Recently i was having some trouble in my network connections so i decided to update the Intel 82576 Gigabit Ethernet Controller driver with the latest one.
The latest one available on site was igb-3.2.10 drivers so i downloaded them and tried to install them but i failed as kernel-development and Development libraries necessary to install the drivers were missing from the OS.
Being a proprietary OS i had to do it using yum.
you may use any of the following command to install the necessary packages and libraries but for my specific case the first one worked well.
The driver file was come as igb-3.2.10.tar.gz
#tar -zxvf igb-3.2.10.tar.gz
#cd igb-3.2.10
#cd src
#make install
and i was able to install the drivers.
Checked the new driver version using
# modinfo driver-name
Source:
http://antarktikos.wordpress.com/2009/12/08/build-essential-equivalent-for-fedora/
http://www.linuxquestions.org/questions/linux-newbie-8/how-do-i-change-network-drivers-915940/
The latest one available on site was igb-3.2.10 drivers so i downloaded them and tried to install them but i failed as kernel-development and Development libraries necessary to install the drivers were missing from the OS.
Being a proprietary OS i had to do it using yum.
you may use any of the following command to install the necessary packages and libraries but for my specific case the first one worked well.
# yum install make automake gcc gcc-c++ kernel-devel byacc
# yum groupinstall ‘Development Tools’
# yum groupinstall ‘Development Libraries’
after installing the necessary packages i head forward to install the drivers.The driver file was come as igb-3.2.10.tar.gz
#tar -zxvf igb-3.2.10.tar.gz
#cd igb-3.2.10
#cd src
#make install
and i was able to install the drivers.
Checked the new driver version using
# modinfo driver-name
Source:
http://antarktikos.wordpress.com/2009/12/08/build-essential-equivalent-for-fedora/
http://www.linuxquestions.org/questions/linux-newbie-8/how-do-i-change-network-drivers-915940/
Thursday, November 24, 2011
Raid 5 simplified
Just visited below page on youtube.
Must admit the video uploader has explained raid 5 very well.
http://www.youtube.com/watch?v=LTq4pGZtzho
On next video you can see how raid 5 works with more than 3 disks (in this case 4).
Must admit the video uploader has explained raid 5 very well.
http://www.youtube.com/watch?v=LTq4pGZtzho
On next video you can see how raid 5 works with more than 3 disks (in this case 4).
Monday, November 21, 2011
OVS repositories are not mounted after server reboot.
repositories are not getting initialized after server reboot.
It has been observed in OVM 2.2.1 that after the server reboot repositories are not getting initialized.
After checking the log files i came to know that Network was unreachable during the initial ovs-agent startup.
So we have made some manual changes to make sure first the server should be in network and then the ovs-agent should be started.
Created a script called ovs-repo and saved it in /etc/init.d
# cat /etc/init.d/ovs-repo
#!/bin/sh
# chkconfig: 2345 99 02
# description: restart ovs agent
#
echo "Waiting for 30 sec's for ovs repository initialization"
sleep 60
service ovs-agent stop
service ovs-agent start
Later created soft link in /etc/rc3.d/
#ln -s /etc/init.d/ovs-repo /etc/rc3.d/S99ovs-repo
added the service in chkconfig
#chkconfig --add ovs-repo
Wednesday, November 9, 2011
Difference between HVM and PVM
A very good article explaining the difference between Hardware virtualized machine and Paravirtual machine is given below.
The article helped me understand how PV machines are faster than HV machines?
http://serverfault.com/questions/222010/difference-between-xen-pv-xen-kvm-and-hvm
The article helped me understand how PV machines are faster than HV machines?
http://serverfault.com/questions/222010/difference-between-xen-pv-xen-kvm-and-hvm
Sunday, October 30, 2011
Advanced Find Command.
my requirement was to list all root owned hidden (dot) files for shell configuration, including but not limited to ~root/.login, ~root/.logout, ~root/.cshrc and ~root/.profile, ~/root/.kshrc ~/root/.bash* must be owned by root,and must have permissions of 0400, 0600 or 0700.
I have gathered below information.
root owned Hidden files for shell configuration lies in /root folder. So i used find to list only hidden files in /root folder.
#find /root -type f -iname ".*"
Then i listed files which are not having permissions of 700,400,600.
#find . -type f -iname ".*" \( ! -perm 700 -and ! -perm 400 -and ! -perm 600 \)
Later added root user condition to display files not owned by root.#find . -type f -iname ".*" \( ! -perm 700 -and ! -perm 400 -and ! -perm 600 -or ! -user root \)
Tuesday, August 16, 2011
Oracle VM manager on Oracle 11g
How to install ORACLE VM manager using Oracle 11g as database?
By default ORACLE VM manager is using oracle express edition as a database.
But it has been observed that oracle 11g is a better alternative to XE. So here is the detailed steps of installing ORACLE VM Manager on top of ORACLE 11g.
Database Version:
Oracle Database 11g software, version 11.1.0.6.0
Step 1: Backup and Uninstall existing OVM (Oracle vm manager)
First you will need to take backup of existing OVM using script stored @ sh /opt/ovs-manager-2.2/bin/backup.sh
Next you will need to uninstall the existing OVM(Oracle vm manager) using runInstaller.sh script .
#sh runInstaller.sh
Welcome to Oracle VM Manager 2.2
Please enter the choice: [1|2|3]
1. Install Oracle VM Manager
2. Uninstall Oracle VM Manager
3. Upgrade Oracle VM Manager
2
Are you sure you want to uninstall Oracle VM Manager? [y|N] (default=N) : y
Uninstalling Oracle VM Manager.
The ovs-manager package (rpm) was not previously installed.
Removing the oc4j package(rpm) ...Done
Removing the oracle-xe-univ package(rpm) ...Done
Oracle VM Manager was removed.
Remove all existing database directories and files This is necessary to avoid any error during oracle 11g installation.
# rm -rf /etc/ora*
# rm -rf /opt/oracle/OraInventory/
#rm -rf /home/oracle/oraInventory
remove ORACLE_HOME entry from oracle user bash_profile
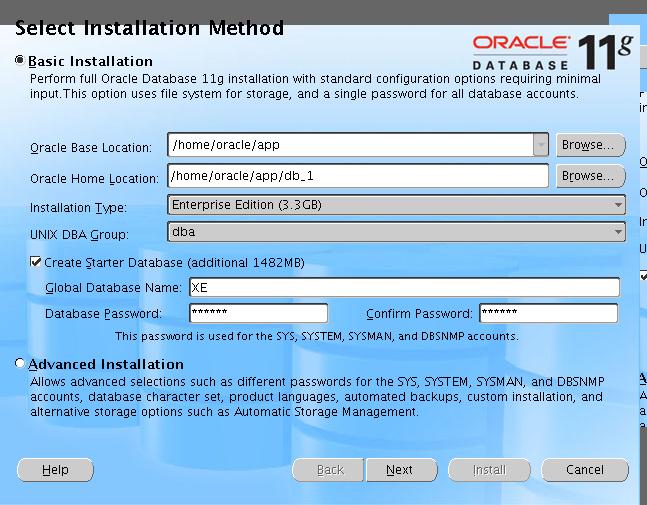
Step 2: Install ORACLE 11g.
export display for getting GUI for installation.
oracle@export DISPLAY=:0.0
login using oracle user .run runInstaller.sh of Oracle 11g.
oracle@sh runInstaller.sh


 At this stage you will need to change some kernel parameters using root login.
#vi /etc/sysctl.conf
edit according to error
and then fire sysctl -p to commit changes.
click back and next on installation screen.
You should get output as below.


 You will need to run the script mentioned in above diagram using root credentials.
# sh /home/oracle/oraInventory/orainstRoot.sh
Changing permissions of /home/oracle/oraInventory to 770.
Changing groupname of /home/oracle/oraInventory to oinstall.
The execution of the script is complete
You have new mail in /var/spool/mail/root
# sh /home/oracle/app/db_1/root.sh
Running Oracle 11g root.sh script...
The following environment variables are set as:
ORACLE_OWNER= oracle
ORACLE_HOME= /home/oracle/app/db_1
Enter the full pathname of the local bin directory: [/usr/local/bin]:
The file "dbhome" already exists in /usr/local/bin. Overwrite it? (y/n)
[n]:
The file "oraenv" already exists in /usr/local/bin. Overwrite it? (y/n)
[n]:
The file "coraenv" already exists in /usr/local/bin. Overwrite it? (y/n)
[n]:
Creating /etc/oratab file...
Entries will be added to the /etc/oratab file as needed by
Database Configuration Assistant when a database is created
Finished running generic part of root.sh script.
Now product-specific root actions will be performed.
Finished product-specific root actions.

Now login using oracle user.
edit bash profile file according to following entries.
export ORACLE_HOME=/home/oracle/app/db_1
export ORACLE_SID=XE
PATH=/usr/sbin:$ORACLE_HOME/bin:$PATH:$HOME/bin; export PATH
Edit listener file according to below entries.
$ cat /home/oracle/app/db_1/network/admin/listener.ora
# listener.ora Network Configuration File: /home/oracle/app/db_1/network/admin/listener.ora
# Generated by Oracle configuration tools.
SID_LIST_LISTENER =
(SID_LIST =
(SID_DESC =
(SID_NAME = XE)
(ORACLE_HOME = /home/oracle/app/db_1)
)
)
LISTENER =
(DESCRIPTION_LIST =
(DESCRIPTION =
(ADDRESS = (PROTOCOL = IPC)(KEY = EXTPROC1522))
(ADDRESS = (PROTOCOL = TCP)(HOST = IPOFTHEMACHINE)(PORT = 1522))
)
)
Now start the listener
$ lsnrctl start
LSNRCTL for Linux: Version 11.1.0.6.0 - Production on 16-AUG-2011 13:32:06
Copyright (c) 1991, 2007, Oracle. All rights reserved.
Starting /home/oracle/app/db_1/bin/tnslsnr: please wait...
TNSLSNR for Linux: Version 11.1.0.6.0 - Production
System parameter file is /home/oracle/app/db_1/network/admin/listener.ora
Log messages written to /home/oracle/app/db_1/log/diag/tnslsnr/HOSTNAME/listener/alert/log.xml
Listening on: (DESCRIPTION=(ADDRESS=(PROTOCOL=ipc)(KEY=EXTPROC1522)))
Listening on: (DESCRIPTION=(ADDRESS=(PROTOCOL=tcp)(HOST=IPADDRESS)(PORT=1522)))
Connecting to (DESCRIPTION=(ADDRESS=(PROTOCOL=IPC)(KEY=EXTPROC1522)))
STATUS of the LISTENER
------------------------
Alias LISTENER
Version TNSLSNR for Linux: Version 11.1.0.6.0 - Production
Start Date 16-AUG-2011 13:32:07
Uptime 0 days 0 hr. 0 min. 0 sec
Trace Level off
Security ON: Local OS Authentication
SNMP OFF
Listener Parameter File /home/oracle/app/db_1/network/admin/listener.ora
Listener Log File /home/oracle/app/db_1/log/diag/tnslsnr/HOSTNAME/listener/alert/log.xml
Listening Endpoints Summary...
(DESCRIPTION=(ADDRESS=(PROTOCOL=ipc)(KEY=EXTPROC1522)))
(DESCRIPTION=(ADDRESS=(PROTOCOL=tcp)(HOST=IPADDRESS)(PORT=1522)))
Services Summary...
Service "XE" has 1 instance(s).
Instance "XE", status UNKNOWN, has 1 handler(s) for this service...
The command completed successfully
Now check the status of database it should be in READ WRITE mode otherwise you will have to make it up.
[oracle@~]$ sqlplus /nolog
SQL*Plus: Release 11.1.0.6.0 - Production on Tue Aug 16 13:32:19 2011
Copyright (c) 1982, 2007, Oracle. All rights reserved.
SQL> connect sys as sysdba
Enter password:
Connected.
SQL> select open_mode from v$database;
OPEN_MODE
----------
READ WRITE
Step 3: Install OVM.
# sh runInstaller.sh
Welcome to Oracle VM Manager 2.2
Please enter the choice: [1|2|3]
1. Install Oracle VM Manager
2. Uninstall Oracle VM Manager
3. Upgrade Oracle VM Manager
1
Starting Oracle VM Manager 2.2 installation ...
Do you want to install a new database or use an existing one? [1|2]
1. Install a new Oracle XE database on localhost
2. Use an existing Oracle database in my network
2
Please enter the database hostname or ip address(Default: HOSTNAME):IPADDRESS
Specify a port that will be used for the database listener [1521]:1522
Please specify the database SID(Default: orcl):XE
Please enter the password for database account 'SYS':
Provisioning Oracle instant client ...
Checking the availability of the database ...
Set default database schema to 'OVS'.
Please enter the password for account 'OVS':
Confirm the password:
Please enter the default tablespace for user OVS(DEFAULT: USERS):
Checking the availability of the tablespace USERS ...
Creating the Oracle VM Manager database schema ...Done
Installing the ovs-manager package (rpm) ...
Done
Installing the oc4j package (rpm) ...
Done
Please enter the password for account 'oc4jadmin':
Confirm the password:
Starting OC4J ... Done.
To access the OC4J Home Page and change the password go to http://127.0.0.1:8888
/em
Deploying Oracle VM Manager application to OC4J container.
Creating connection pool ... Done
Creating data source ... Done
Deploying application help ... Done
Deploying application ... Done
Please enter the keystore password for the Web Service:
Confirm the password:
Setting keystore password for Web Service ... Done
Do you want to use HTTPS access for Oracle VM Manager (Y|n)?n
Configuring OC4J to use HTTP ... Done
Stopping OC4J ... Done
Starting OC4J ... Done
Please enter the password for the default account 'admin':
Confirm the password:
Configuring SMTP server ...
Please enter the outgoing SMTP mail server(e.g. - mail.abc.com, mail.abc.com:25): mailserver.domain.com
Mail server checking, may need some time, please wait ...
Setting the SMTP server to mailserver.domain.com ...
Done
Please enter an e-mail address for account 'admin': abc@domain.com
Confirm the e-mail address : abc@domain.com
Unable to send an email to 'abc@domain.com', would you like to change the email address(Y|n)?n
Updating e-mail address for account 'admin' to 'abc@domain.com' ...
Done
The console feature is not enabled by default.
For detailed setup, refer to Oracle VM Manager User's Guide
Installation of Oracle VM Manager completed successfully.
To access the Oracle VM Manager 2.2 home page go to:
http://IPADDRESS:8888/OVS
To access the Oracle VM Manager web services WSDL page go to:
http://IPADDRESS:8888/OVSWS/LifecycleService.wsdl
http://IPADDRESS:8888/OVSWS/ResourceService.wsdl
http://IPADDRESS:8888/OVSWS/PluginService.wsdl
http://IPADDRESS:8888/OVSWS/ServerPoolService.wsdl
http://IPADDRESS:8888/OVSWS/VirtualMachineService.wsdl
http://IPADDRESS:8888/OVSWS/AdminService.wsdl
To access the Oracle VM Manager help page go to:
http://IPADDRESS:8888/help/help
By default ORACLE VM manager is using oracle express edition as a database.
But it has been observed that oracle 11g is a better alternative to XE. So here is the detailed steps of installing ORACLE VM Manager on top of ORACLE 11g.
Database Version:
Oracle Database 11g software, version 11.1.0.6.0
Step 1: Backup and Uninstall existing OVM (Oracle vm manager)
First you will need to take backup of existing OVM using script stored @ sh /opt/ovs-manager-2.2/bin/backup.sh
Next you will need to uninstall the existing OVM(Oracle vm manager) using runInstaller.sh script .
#sh runInstaller.sh
Welcome to Oracle VM Manager 2.2
Please enter the choice: [1|2|3]
1. Install Oracle VM Manager
2. Uninstall Oracle VM Manager
3. Upgrade Oracle VM Manager
2
Are you sure you want to uninstall Oracle VM Manager? [y|N] (default=N) : y
Uninstalling Oracle VM Manager.
The ovs-manager package (rpm) was not previously installed.
Removing the oc4j package(rpm) ...Done
Removing the oracle-xe-univ package(rpm) ...Done
Oracle VM Manager was removed.
Remove all existing database directories and files This is necessary to avoid any error during oracle 11g installation.
# rm -rf /etc/ora*
# rm -rf /opt/oracle/OraInventory/
#rm -rf /home/oracle/oraInventory
remove ORACLE_HOME entry from oracle user bash_profile
Step 2: Install ORACLE 11g.
export display for getting GUI for installation.
oracle@export DISPLAY=
login using oracle user .run runInstaller.sh of Oracle 11g.
oracle@sh runInstaller.sh

 At this stage you will need to change some kernel parameters using root login.
#vi /etc/sysctl.conf
edit according to error
and then fire sysctl -p to commit changes.
click back and next on installation screen.
You should get output as below.


 You will need to run the script mentioned in above diagram using root credentials.
# sh /home/oracle/oraInventory/orainstRoot.sh
Changing permissions of /home/oracle/oraInventory to 770.
Changing groupname of /home/oracle/oraInventory to oinstall.
The execution of the script is complete
You have new mail in /var/spool/mail/root
# sh /home/oracle/app/db_1/root.sh
Running Oracle 11g root.sh script...
The following environment variables are set as:
ORACLE_OWNER= oracle
ORACLE_HOME= /home/oracle/app/db_1
Enter the full pathname of the local bin directory: [/usr/local/bin]:
The file "dbhome" already exists in /usr/local/bin. Overwrite it? (y/n)
[n]:
The file "oraenv" already exists in /usr/local/bin. Overwrite it? (y/n)
[n]:
The file "coraenv" already exists in /usr/local/bin. Overwrite it? (y/n)
[n]:
Creating /etc/oratab file...
Entries will be added to the /etc/oratab file as needed by
Database Configuration Assistant when a database is created
Finished running generic part of root.sh script.
Now product-specific root actions will be performed.
Finished product-specific root actions.

Now login using oracle user.
edit bash profile file according to following entries.
export ORACLE_HOME=/home/oracle/app/db_1
export ORACLE_SID=XE
PATH=/usr/sbin:$ORACLE_HOME/bin:$PATH:$HOME/bin; export PATH
Edit listener file according to below entries.
$ cat /home/oracle/app/db_1/network/admin/listener.ora
# listener.ora Network Configuration File: /home/oracle/app/db_1/network/admin/listener.ora
# Generated by Oracle configuration tools.
SID_LIST_LISTENER =
(SID_LIST =
(SID_DESC =
(SID_NAME = XE)
(ORACLE_HOME = /home/oracle/app/db_1)
)
)
LISTENER =
(DESCRIPTION_LIST =
(DESCRIPTION =
(ADDRESS = (PROTOCOL = IPC)(KEY = EXTPROC1522))
(ADDRESS = (PROTOCOL = TCP)(HOST = IPOFTHEMACHINE)(PORT = 1522))
)
)
Now start the listener
$ lsnrctl start
LSNRCTL for Linux: Version 11.1.0.6.0 - Production on 16-AUG-2011 13:32:06
Copyright (c) 1991, 2007, Oracle. All rights reserved.
Starting /home/oracle/app/db_1/bin/tnslsnr: please wait...
TNSLSNR for Linux: Version 11.1.0.6.0 - Production
System parameter file is /home/oracle/app/db_1/network/admin/listener.ora
Log messages written to /home/oracle/app/db_1/log/diag/tnslsnr/HOSTNAME/listener/alert/log.xml
Listening on: (DESCRIPTION=(ADDRESS=(PROTOCOL=ipc)(KEY=EXTPROC1522)))
Listening on: (DESCRIPTION=(ADDRESS=(PROTOCOL=tcp)(HOST=IPADDRESS)(PORT=1522)))
Connecting to (DESCRIPTION=(ADDRESS=(PROTOCOL=IPC)(KEY=EXTPROC1522)))
STATUS of the LISTENER
------------------------
Alias LISTENER
Version TNSLSNR for Linux: Version 11.1.0.6.0 - Production
Start Date 16-AUG-2011 13:32:07
Uptime 0 days 0 hr. 0 min. 0 sec
Trace Level off
Security ON: Local OS Authentication
SNMP OFF
Listener Parameter File /home/oracle/app/db_1/network/admin/listener.ora
Listener Log File /home/oracle/app/db_1/log/diag/tnslsnr/HOSTNAME/listener/alert/log.xml
Listening Endpoints Summary...
(DESCRIPTION=(ADDRESS=(PROTOCOL=ipc)(KEY=EXTPROC1522)))
(DESCRIPTION=(ADDRESS=(PROTOCOL=tcp)(HOST=IPADDRESS)(PORT=1522)))
Services Summary...
Service "XE" has 1 instance(s).
Instance "XE", status UNKNOWN, has 1 handler(s) for this service...
The command completed successfully
Now check the status of database it should be in READ WRITE mode otherwise you will have to make it up.
[oracle@~]$ sqlplus /nolog
SQL*Plus: Release 11.1.0.6.0 - Production on Tue Aug 16 13:32:19 2011
Copyright (c) 1982, 2007, Oracle. All rights reserved.
SQL> connect sys as sysdba
Enter password:
Connected.
SQL> select open_mode from v$database;
OPEN_MODE
----------
READ WRITE
Step 3: Install OVM.
# sh runInstaller.sh
Welcome to Oracle VM Manager 2.2
Please enter the choice: [1|2|3]
1. Install Oracle VM Manager
2. Uninstall Oracle VM Manager
3. Upgrade Oracle VM Manager
1
Starting Oracle VM Manager 2.2 installation ...
Do you want to install a new database or use an existing one? [1|2]
1. Install a new Oracle XE database on localhost
2. Use an existing Oracle database in my network
2
Please enter the database hostname or ip address(Default: HOSTNAME):IPADDRESS
Specify a port that will be used for the database listener [1521]:1522
Please specify the database SID(Default: orcl):XE
Please enter the password for database account 'SYS':
Provisioning Oracle instant client ...
Checking the availability of the database ...
Set default database schema to 'OVS'.
Please enter the password for account 'OVS':
Confirm the password:
Please enter the default tablespace for user OVS(DEFAULT: USERS):
Checking the availability of the tablespace USERS ...
Creating the Oracle VM Manager database schema ...Done
Installing the ovs-manager package (rpm) ...
Done
Installing the oc4j package (rpm) ...
Done
Please enter the password for account 'oc4jadmin':
Confirm the password:
Starting OC4J ... Done.
To access the OC4J Home Page and change the password go to http://127.0.0.1:8888
/em
Deploying Oracle VM Manager application to OC4J container.
Creating connection pool ... Done
Creating data source ... Done
Deploying application help ... Done
Deploying application ... Done
Please enter the keystore password for the Web Service:
Confirm the password:
Setting keystore password for Web Service ... Done
Do you want to use HTTPS access for Oracle VM Manager (Y|n)?n
Configuring OC4J to use HTTP ... Done
Stopping OC4J ... Done
Starting OC4J ... Done
Please enter the password for the default account 'admin':
Confirm the password:
Configuring SMTP server ...
Please enter the outgoing SMTP mail server(e.g. - mail.abc.com, mail.abc.com:25): mailserver.domain.com
Mail server checking, may need some time, please wait ...
Setting the SMTP server to mailserver.domain.com ...
Done
Please enter an e-mail address for account 'admin': abc@domain.com
Confirm the e-mail address : abc@domain.com
Unable to send an email to 'abc@domain.com', would you like to change the email address(Y|n)?n
Updating e-mail address for account 'admin' to 'abc@domain.com' ...
Done
The console feature is not enabled by default.
For detailed setup, refer to Oracle VM Manager User's Guide
Installation of Oracle VM Manager completed successfully.
To access the Oracle VM Manager 2.2 home page go to:
http://IPADDRESS:8888/OVS
To access the Oracle VM Manager web services WSDL page go to:
http://IPADDRESS:8888/OVSWS/LifecycleService.wsdl
http://IPADDRESS:8888/OVSWS/ResourceService.wsdl
http://IPADDRESS:8888/OVSWS/PluginService.wsdl
http://IPADDRESS:8888/OVSWS/ServerPoolService.wsdl
http://IPADDRESS:8888/OVSWS/VirtualMachineService.wsdl
http://IPADDRESS:8888/OVSWS/AdminService.wsdl
To access the Oracle VM Manager help page go to:
http://IPADDRESS:8888/help/help
Thursday, August 11, 2011
PowerBrocker or Sudo Which one is better?
I was given a task to implement security policies with in a set of server environment.
The first thing that comes into my mind ,"Shall i go for 3rd party utility or use existing system utilities to achieve this?"
With little bit googling i come across a fine utility called powerbroker.
http://www.beyondtrust.com/Products/PowerBroker-Servers-Unix/
It had everything i was looking after but then "It was not free or open sourced"
I needed to know How effective is Power-brocker utility over SUDO? After posting my query on linux forums i got to know lot of pro/cons about using PB over SUDO.
Here is the link which helped me decide on Which one is better?
http://webcache.googleusercontent.com/search?q=cache:ANT8RddJJdIJ:forums11.itrc.hp.com/service/forums/questionanswer.do%3FthreadId%3D956140+Power+broker+sudo&cd=2&hl=en&ct=clnk&source=www.google.com
Currently looking for an open sourced utility to achieve this.
Monday, August 1, 2011
How to get Numeric representation of file/directories in linux?
Numeric representation of permission.
#stat -c %a /tmp/CPUUTILIZATION.log
644
#stat -c %a /tmp/CPUUTILIZATION.log
644
Tuesday, July 26, 2011
How to Download RPM using yum?
For example:
Consider a scenario where you would only need to download the rpm and not necessarily install it.
You will have to install an additional rpm called yum-downloadonly
yum install yum-downloadonly
Once the above rpm is installed all you have to do is run below command.
yum install sendmail-cf-8.13.8-2.el5 -y --downloadonly --downloaddir=/tmp
(In above example sendmail-cf-8.13.8-2.el5 rpm is downloaded and stored in /tmp .in your case it could be anything.)
The above command will only download the rpm and not necessarily installed it.
Note:
(I would recommend you to run above command where rpm getting downloaded is not already installed in my case it is sendmail-cf-8.13.8-2.el5 .Otherwise you will get an error saying rpm is already installed.You may remove the rpm using rpm -e )
Wednesday, July 20, 2011
NFS Monitoring
You can use iostat -n option for finding network statistic of NFS share.
Please Leave us with your comments and Queries/Suggestions.
           I will try to reply asap.
Disk Monitoring using iostat
The iostat utility is run on virtual machine hosted on Virtual BOX.
# iostat
Linux 2.6.18-92.el5 (PuppetMaster) 07/20/2011
avg-cpu: %user %nice %system %iowait %steal %idle
0.05 0.08 0.65 0.04 0.00 99.18
Device: tps Blk_read/s Blk_wrtn/s Blk_read Blk_wrtn
sda 0.18 2.43 2.86 1430655 1686634
dm-0 0.43 1.63 2.86 963178 1686624
dm-1 0.00 0.00 0.00 896 0
# iostat
Linux 2.6.18-92.el5 (PuppetMaster) 07/20/2011
avg-cpu: %user %nice %system %iowait %steal %idle
0.05 0.08 0.65 0.04 0.00 99.18
Device: tps Blk_read/s Blk_wrtn/s Blk_read Blk_wrtn
sda 0.18 2.43 2.86 1430655 1686634
dm-0 0.43 1.63 2.86 963178 1686624
dm-1 0.00 0.00 0.00 896 0
Wednesday, July 13, 2011
Hdparm for beginners.
There are numerous Harddisk monitoring utilities are available and Hdparm is one of them.
Why use Hdparm?
Its a most commonly found utility on most of the linux distribution.
Simple and Easy to understand.
In this article we are going to see only two options available with Hdparm .
you may find following link useful to understand the definitions given below.
http://linux.about.com/od/lsa_guide/a/gdelsa44.htm
1) -t
Perform timings of device reads for benchmark and comparison purposes. For meaningful results, this operation should be repeated 2-3 times on an otherwise inactive system (no other active processes) with at least a couple of megabytes of free memory. This displays the speed of reading through the buffer cache to the disk without any prior caching of data. This measurement is an indication of how fast the drive can sustain sequential data reads under Linux, without any filesystem overhead. To ensure accurate measurements, the buffer cache is flushed during the processing of -t using the BLKFLSBUF ioctl. If the -T flag is also specified, then a correction factor based on the outcome of -T will be incorporated into the result reported for the -t operation.(Source Man pages)
If above definition is little difficult to understand ,see if this helps.
As you know for the very first read the data is first read from Disk and stored into RAM .For the next read for same data instead of taking the data from disk the data in RAM is read for faster reading.
Well -t option make sure only the timing between data being read from disk and stored into ram is calculated.
2) -T
Perform timings of cache reads for benchmark and comparison purposes. For meaningful results, this operation should be repeated 2-3 times on an otherwise inactive system (no other active processes) with at least a couple of megabytes of free memory. This displays the speed of reading directly from the Linux buffer cache without disk access. This measurement is essentially an indication of the throughput of the processor, cache, and memory of the system under test. If the -t flag is also specified, then a correction factor based on the outcome of -T will be incorporated into the result reported for the -t operation.
If above definition is little difficult to understand ,see if this helps.
Well -T option make sure only the timing between data being read from RAM is calculated.In this process Actual Disk read doesn't happen.
There are many options available but the options described in this article are very commonly used for storage monitoring.
hdparm output for my machine:
# hdparm -t /dev/sda
/dev/sda:
Timing buffered disk reads: 108 MB in 3.04 seconds = 35.51 MB/sec
# hdparm -T /dev/sda
/dev/sda:
Timing cached reads: 3496 MB in 1.99 seconds = 1756.56 MB/sec
Wednesday, July 6, 2011
Puppet Server and Client Installation and Configuration Version 2.7.1
Puppet Server & Client Installation & Configuration Version 2.7.1
Server Side Installation
Host Name: PuppetMaster
ruby-1.8.5-5.el5_4.8
ruby-libs-1.8.5-5.el5_4.8
Facter 1.6.0 (tar+gzip)
(http://www.puppetlabs.com/misc/download-options/)
puppet-2.7.1 (tar.gz)
(http://www.puppetlabs.com/misc/download-options/ )
Note :
Please follow above sequence for installation.)
A supported Ruby version. Ruby 1.8.5, 1.8.7, and 1.9.2 are fully supported (with a handful of known issues under 1.9.2); Ruby 1.8.1 is supported on a best-effort basis for agent use only. Other versions of Ruby are used at your own risk, and Ruby 1.8.6, 1.9.0, and 1.9.1 are not recommended for compatibility reasons.
To avoid any certification error Make sure following criteria’s are full filled
1) Make sure the time on puppet Server and puppet client is in sync.
2) Make sure that /etc/hosts file has proper entry on both puppet client and puppet server.
Installation Steps:
1) ruby-1.8.5-5.el5_4.8
# yum install ruby
Confirm the installation :
# rpm -qa | grep ruby
ruby-1.8.5-5.el5_4.8
ruby-libs-1.8.5-5.el5_4.8
# ruby --version
ruby 1.8.5 (2006-08-25) [i386-linux]
2) ruby-libs-1.8.5-5.el5_4.8
will get installed if you run yum install ruby.
4) Facter 1.6.0 (tar+gzip)
#gunzip facter-1.6.0.tar.gz
#tar -xvf facter-1.6.0.tar
#cd facter-1.6.0
#ruby install.rb
Confirm the installation.
# facter --version
1.6.0
5) puppet-2.7.1 (tar.gz)
#gunzip /install/puppet-2.7.1.tar.gz
#tar -xvf puppet-2.7.1.tar
#cd puppet-2.7.1
#ruby install.rb
Confirm the installation.
# puppet --version
2.7.1
#puppetmasterd --version
2.7.1
#puppetd --version
2.7.1
#puppetca --version
2.7.1
Configuration:
Step 1: Create manifests folder
#mkdir -p /etc/puppet/manifests
Step 2: place your site.pp file into it.
Content of site.pp file
{ "/etc/sudoers":
owner => root,group => root, mode => 440
}
Above lines ensures that /etc/sudoers files at client meets following requirement.
owner = root, group = root, mode = 440
Step 3: Start the puppet master.
# puppet master --mkusers
Note: Example given here demonstrates following
the basic puppet (2.7.1)
setup Getting started with puppet (2.7.1)
(A simple check to see the file permission is achieved through puppet)
Client Side Installation
Installation Steps:
Note :
There are no separate steps for puppet client installation. Whatever Installation steps are performed in Puppet Server needs to be done in puppet client as well.
Configuration Step
For the First run you will need to register your client at server.
(Read further in this article to see how to register your client at server.)
This is the default behavior and can be changed . But for the security reason its recommended not to set the server on auto signing mode.
Server Side Installation
Host Name: PuppetMaster
ruby-1.8.5-5.el5_4.8
ruby-libs-1.8.5-5.el5_4.8
Facter 1.6.0 (tar+gzip)
(http://www.puppetlabs.com/misc/download-options/)
puppet-2.7.1 (tar.gz)
(http://www.puppetlabs.com/misc/download-options/ )
Note :
Please follow above sequence for installation.)
A supported Ruby version. Ruby 1.8.5, 1.8.7, and 1.9.2 are fully supported (with a handful of known issues under 1.9.2); Ruby 1.8.1 is supported on a best-effort basis for agent use only. Other versions of Ruby are used at your own risk, and Ruby 1.8.6, 1.9.0, and 1.9.1 are not recommended for compatibility reasons.
To avoid any certification error Make sure following criteria’s are full filled
1) Make sure the time on puppet Server and puppet client is in sync.
2) Make sure that /etc/hosts file has proper entry on both puppet client and puppet server.
Installation Steps:
1) ruby-1.8.5-5.el5_4.8
# yum install ruby
Confirm the installation :
# rpm -qa | grep ruby
ruby-1.8.5-5.el5_4.8
ruby-libs-1.8.5-5.el5_4.8
# ruby --version
ruby 1.8.5 (2006-08-25) [i386-linux]
2) ruby-libs-1.8.5-5.el5_4.8
will get installed if you run yum install ruby.
4) Facter 1.6.0 (tar+gzip)
#gunzip facter-1.6.0.tar.gz
#tar -xvf facter-1.6.0.tar
#cd facter-1.6.0
#ruby install.rb
Confirm the installation.
# facter --version
1.6.0
5) puppet-2.7.1 (tar.gz)
#gunzip /install/puppet-2.7.1.tar.gz
#tar -xvf puppet-2.7.1.tar
#cd puppet-2.7.1
#ruby install.rb
Confirm the installation.
# puppet --version
2.7.1
#puppetmasterd --version
2.7.1
#puppetd --version
2.7.1
#puppetca --version
2.7.1
Configuration:
Step 1: Create manifests folder
#mkdir -p /etc/puppet/manifests
Step 2: place your site.pp file into it.
Content of site.pp file
{ "/etc/sudoers":
owner => root,group => root, mode => 440
}
Above lines ensures that /etc/sudoers files at client meets following requirement.
owner = root, group = root, mode = 440
Step 3: Start the puppet master.
# puppet master --mkusers
Note: Example given here demonstrates following
the basic puppet (2.7.1)
setup Getting started with puppet (2.7.1)
(A simple check to see the file permission is achieved through puppet)
Client Side Installation
Installation Steps:
Note :
There are no separate steps for puppet client installation. Whatever Installation steps are performed in Puppet Server needs to be done in puppet client as well.
Configuration Step
Step 1:
Run following command to implement the rules defined at Puppet server.
# puppet agent --server puppetmaster --waitforcert 60 –test
info: Creating a new SSL key for puppetclient.domain.com
warning: peer certificate won't be verified in this SSL session
info: Caching certificate for ca
warning: peer certificate won't be verified in this SSL session
warning: peer certificate won't be verified in this SSL session
info: Creating a new SSL certificate request for puppetclient.domain.com
info: Certificate Request fingerprint (md5): 72:C6:73:89:B9:69:D9:8D:93:69:C3:69:14:AD:7E:E2
warning: peer certificate won't be verified in this SSL session
warning: peer certificate won't be verified in this SSL session
warning: peer certificate won't be verified in this SSL session
Note:
For the First run you will need to register your client at server.
(Read further in this article to see how to register your client at server.)
After registration of client on Server you should get following response.
# puppet agent --server PuppetMaster --waitforcert 60 --test
info: Caching catalog for puppetclient.domain.com
info: Applying configuration version '1309406496'
info: Creating state file /var/lib/puppet/state/state.yaml
notice: Finished catalog run in 0.05 seconds
As /etc/sudoers file meet the puppet servers manifest we didn’t notice any change in above output.
# ls -ltr /etc/sudoers
-r--r----- 1 root root 3185 Jan 22 2009 /etc/sudoers
To actually see the changes at puppet client lets modify /etc/sudoers file .
[root@puppetclient tmp]# chmod 777 /etc/sudoers
[root@puppetclient tmp]# chown ftp:root /etc/sudoers
[root@puppetclient tmp]# ls -ltr /etc/sudoers
-rwxrwxrwx 1 ftp root 3185 Jan 22 2009 /etc/sudoers
Now when the permissions on /etc/sudoers is changed on puppet client .
We will run the command once again and check the output.
# puppet agent --server PuppetMaster --waitforcert 60 --test
info: Caching catalog for puppetclient.domain.com
info: Applying configuration version '1309406496'
notice: /Stage[main]//File[/etc/sudoers]/owner: owner changed 'ftp' to 'root'
notice: /Stage[main]//File[/etc/sudoers]/mode: mode changed '777' to '440'
notice: Finished catalog run in 0.11 seconds
Now check the permission.
[root@puppetclient tmp]# ls -ltr /etc/sudoers
-r--r----- 1 root root 3185 Jan 22 2009 /etc/sudoers
As you can see puppet master has implemented the rule on puppet client.
Register puppet client on puppet server:
Whenever a puppet client request for puppet certificate for the first time, client won’t get it unless server signs clients certificate at server end.
Here are the steps to sign clients certificate at server end.
Step 1:
List the available certificates
# puppetca -l
puppetclient.domain.com
Step 2:
Sign them
# puppetca -s puppetclient.domain.com
notice: Signed certificate request for puppetclient.domain.com
notice: Removing file Puppet::SSL::CertificateRequest puppetclient.domain.com at '/etc/puppet/ssl/ca/requests/puppetclient.domain.com.pem'
Note:
This is the default behavior and can be changed . But for the security reason its recommended not to set the server on auto signing mode.
Subscribe to:
Posts (Atom)