With So many online guides available over LDAP configuration I decided to go with following
http://www.linuxhomenetworking.com/wiki/index.php/Quick_HOWTO_:_Ch31_:_Centralized_Logins_Using_LDAP_and_RADIUSOperating system used :
LDAP Server:
# lsb_release -aLSB Version: :core-3.1-ia32:core-3.1-noarch:graphics-3.1-ia32:graphics-3.1-noarchDistributor ID: EnterpriseEnterpriseServerDescription: Enterprise Linux Enterprise Linux Server release 5.2 (Carthage)Release: 5.2Codename: Carthage# uname -aLinux LDAPServer 2.6.18-92.el5 #1 SMP Fri May 23 22:17:30 EDT 2008 i686 i686 i386 GNU/LinuxLDAP Client:
# lsb_release -aLSB Version: :core-3.1-ia32:core-3.1-noarch:graphics-3.1-ia32:graphics-3.1-noarchDistributor ID: EnterpriseEnterpriseServerDescription: Enterprise Linux Enterprise Linux Server release 5.2 (Carthage)Release: 5.2Codename: Carthage# uname -aLinux LDAPClient .6.18-92.el5 #1 SMP Fri May 23 22:17:30 EDT 2008 i686 i686 i386 GNU/LinuxStep 1:Install Necessary softwares on LDAP Server.As per the guide i have checked my machine for required rpms (Which is going to serve as LDAP Server).
5 basic rpms are needed for LDAP Server .
1)openldap2)openldap-clients3)openldap-devel4)nss_ldap5)openldap-serversI checked my server whether they are present or not.
#rpm -qa | grep ldap
mozldap-6.0.5-1.el5
openldap-2.3.27-8.el5_1.3
nss_ldap-253-12.el5
python-ldap-2.2.0-2.1
I checked my server whether they are present or not.
From Above of above command i came to know, my machine was lacking 3 major rpms.
openldap-clients
openldap-developenldap-serversSo i have downloaded required rpms and their dependencies.(Most of the times the required rpms are available in Operating system CDs).
i> openldap-servers-2.3.27-8.el5_1.3.i386.rpm(Dependence :libtool-ltdl-1.5.22-7.el5_4.i386.rpm)
# rpm -ivh libtool-ltdl-1.5.22-7.el5_4.i386.rpm warning: libtool-ltdl-1.5.22-7.el5_4.i386.rpm: Header V3 DSA signature: NOKEY, key ID e8562897 Preparing... ########################################### [100%] 1:libtool-ltdl ########################################### [100%] # rpm -ivh openldap-servers-2.3.27-8.el5_1.3.i386.rpm warning: openldap-servers-2.3.27-8.el5_1.3.i386.rpm: Header V3 DSA signature: NOKEY, key ID 1e5e0159 Preparing... ########################################### [100%] 1:openldap-servers ########################################### [100%]ii> openldap-devel-2.3.27-8.el5_1.3.i386.rpm(Dependence :cyrus-sasl-devel-2.1.22-4.i386.rpm)
# rpm -ivh openldap-clients-2.3.27-8.el5_1.3.i386.rpm warning: openldap-clients-2.3.27-8.el5_1.3.i386.rpm: Header V3 DSA signature: NOKEY, key ID 1e5e0159 Preparing... ########################################### [100%] 1:openldap-clients ########################################### [100%]iii> openldap-clients-2.3.27-8.el5_1.3.i386.rpm# rpm -ivh cyrus-sasl-devel-2.1.22-4.i386.rpmwarning: cyrus-sasl-devel-2.1.22-4.i386.rpm: Header V3 DSA signature: NOKEY, key ID 1e5e0159Preparing... ########################################### [100%] 1:cyrus-sasl-devel ########################################### [100%]# rpm -ivh openldap-devel-2.3.27-8.el5_1.3.i386.rpmwarning: openldap-devel-2.3.27-8.el5_1.3.i386.rpm: Header V3 DSA signature: NOKEY, key ID 1e5e0159Preparing... ########################################### [100%] 1:openldap-devel ########################################### [100%]
Make sure You have installed all necessary rpms for your LDAP server and proceed to next step if the output is similar to mine(Note Version may differ according to your Linux Distribution).
# rpm -qa | grep ldap
mozldap-6.0.5-1.el5
openldap-servers-2.3.27-8.el5_1.3
openldap-2.3.27-8.el5_1.3
nss_ldap-253-12.el5
python-ldap-2.2.0-2.1
openldap-clients-2.3.27-8.el5_1.3
openldap-devel-2.3.27-8.el5_1.3
Step 2: LDAP Server Configuration.
once you are done with installation of necessary rpms on Server side .Its time to configure LDAP server.
I have decided to give a LDAP server name as "LDAPServer.com".You can change it according to your organizational need.
2.1>Create a directory to store LDAP Server Data.#mkdir /var/lib/ldap/LDAPServer.comChange the ownership to ldap user.
#chown ldap:ldap /var/lib/ldap/LDAPServer.com2.2>Generate root password for LDAP Server.This can be done using slappasswd utility.
# slappasswd
# slappasswdNew password:Re-enter new password:{SSHA}2AnxPwRuOFI5/N/ewYtRrneHazxCyT2Q
save this encrypted password in notepad
2.3>Configure slapd.conf.File Location:
/etc/openldap/slapd.conf
Search and modify the following lines.
Original lines
suffix "dc=my-domain,dc=com"rootdn "cn=Manager,dc=my-domain,dc=com"# rootpw secret# rootpw {crypt}ijFYNcSNctBYgdirectory /var/lib/ldapModified lines
suffix "dc=LDAPServer.com,dc=com"rootdn "cn=Manager,dc=LDAPServer.com,dc=com"rootpw secretrootpw {SSHA}2AnxPwRuOFI5/N/ewYtRrneHazxCyT2Q
directory /var/lib/ldap/LDAPServer.com
Note : rootpw is the same that is generated in using slappasswd .
2.4>Build LDAP database.2.4.1>Download and Configure MigrationTools.This process involves copying your system account to ldap accounts.
You will need to download Migrationtools from following sites.
http://www.padl.com/download/MigrationTools.tgzMost of modern linux distributions already have these tools under
/usr/share/openldap/migration/But i proffered to update them by merely replacing them with the the one downloaded from above sites.
Make sure following directory exists in your distribution /usr/share/openldap/migration/.
If not make it using
#mkdir -p /usr/share/openldap/migration/Extract MigrationTools.tgz
# tar -xvf MigrationTools.tgzMigrationTools-47/MigrationTools-47/ads/MigrationTools-47/ads/migrate_passwd_ads.plMigrationTools-47/ads/migrate_all_online_ads.shMigrationTools-47/ads/migrate_group_ads.plMigrationTools-47/ads/migrate_all_nis_online_ads.shMigrationTools-47/ads/migrate_base.plMigrationTools-47/ads/migrate_common.phMigrationTools-47/MigrationTools.specMigrationTools-47/migrate_netgroup_byhost.plMigrationTools-47/migrate_all_nis_offline.shMigrationTools-47/Make.rulesMigrationTools-47/migrate_aliases.plMigrationTools-47/READMEMigrationTools-47/migrate_rpc.plMigrationTools-47/migrate_all_offline.shMigrationTools-47/migrate_group.plMigrationTools-47/migrate_all_nisplus_offline.shMigrationTools-47/migrate_all_netinfo_online.shMigrationTools-47/migrate_protocols.plMigrationTools-47/migrate_hosts.plMigrationTools-47/CVSVersionInfo.txtMigrationTools-47/migrate_automount.plMigrationTools-47/migrate_services.plMigrationTools-47/migrate_netgroup.plMigrationTools-47/migrate_profile.plMigrationTools-47/migrate_base.plMigrationTools-47/migrate_all_nisplus_online.shMigrationTools-47/migrate_common.phMigrationTools-47/migrate_all_nis_online.shMigrationTools-47/migrate_all_online.shMigrationTools-47/migrate_passwd.plMigrationTools-47/migrate_networks.plMigrationTools-47/migrate_fstab.plMigrationTools-47/migrate_slapd_conf.plMigrationTools-47/migrate_netgroup_byuser.plMigrationTools-47/migrate_all_netinfo_offline.shNow go to Newly created MigrationTools-47 directory and copy its contents to /usr/share/openldap/migration/
#cp -rv * /usr/share/openldap/migration/(You may be asked to overwrite the existing files if migration folder already exists in your distribution just overwrite it)
2.4.2>Configure /usr/share/openldap/migration/migrate_common.ph.
Edit
migrate_common.ph and replace every instance of padl to LDAP Server Name (in our case LDAPServer)
you can use following command to replace it using vi editor.
vi
/usr/share/openldap/migration/migrate_common.ph
press Esc
:s/padl/LDAPServer/g
Save and exit.
(s means substitute padl to LDAPServer).
(g (global) Every instance of padl will be replaced with LDAPServer).
2.4.3>Build LDAP database.
Run
# updatedb
Find out the location of your ldap database file using
# locate DB_CONFIG/etc/openldap/DB_CONFIG.exampleNow run
# cp /etc/openldap/DB_CONFIG.example /var/lib/ldap/LDAPServer.com/DB_CONFIG2.4.4>LDAP DB Creation
Just run following command.
# ./migrate_all_offline.shCreating naming context entries...Migrating aliases...Migrating groups...Migrating hosts...Migrating networks...Migrating users...Migrating protocols...Migrating rpcs...Migrating services...Migrating netgroups...Importing into LDAP...Migrating netgroups (by user)...Migrating netgroups (by host)...Preparing LDAP database.../etc/openldap/slapd.conf: line 74: can only be set when rootdn is under suffixslapadd: bad configuration file!Migration failed: saving failed LDIF to /tmp/nis.6247.ldif# chown -R ldap:ldap /var/lib/ldap/LDAPServer.com/start ldap server.
#service ldap startAt this point you are done with server side configuration that is necessary for LDAP.
User creation can be done using Webmin or It can also be done manually as described in Later section.
Lets head towards client side configuration.
2.5>Create LDAP user.This is created using 2 step.
1)Create Local User.
2)Use script to add Local User to LDAP Database.
Make sure ldap service is running using.
#service ldap status
if the service is stopped then run it using.
#service ldap startLogged in with root user.
Lets create a local user say (helpdesk).
#adduser helpdesk#passwd helpdeskNow create a script named addldapuser.sh and save it to /usr/local/sbin.
content of script
#!/bin/bashcd /usr/share/openldap/migrationgrep $1 /etc/passwd > /tmp/changeldappasswd.tmp/usr/share/openldap/migration/migrate_passwd.pl \ /tmp/changeldappasswd.tmp /tmp/changeldappasswd.ldif.tmpcat /tmp/changeldappasswd.ldif.tmp | sed s/padl/example/ \ > /tmp/changeldappasswd.ldifldapadd -x -D "cn=Manager,dc=LDAPServer,dc=com" -W -f \ /tmp/changeldappasswd.ldifrm -f /tmp/changeldappasswd.*Give execute permission to root only.
# chmod u+x addldapuser.sh# addldapuser.sh helpdeskEnter LDAP Password:adding new entry "uid=helpdesk,ou=People,dc=LDAPServer,dc=com".
Step 3: LDAP Client Configuration.4 basic rpms are needed for LDAP Client.
openldapopenldap-clientsopenldap-develnss_ldap
Installed necessary software for client configuration so that the output of below command should match.(Version may vary according to your distribution).
# rpm -qa | grep ldapmozldap-6.0.5-1.el5openldap-2.3.27-8.el5_1.3nss_ldap-253-12.el5python-ldap-2.2.0-2.1openldap-clients-2.3.27-8.el5_1.3openldap-devel-2.3.27-8.el5_1.33.1>Modify /etc/openldap/ldap.confTo configure LDAP client you will need to modify client's /etc/openldap/ldap.conf file.
The easiest way of modifying the file is typing .
# env LANG=C authconfig-tui
Make sure you select same options as described in image below.(Click on the picture to zoom it)
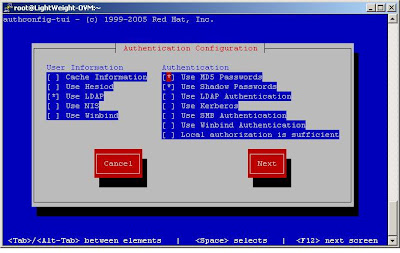
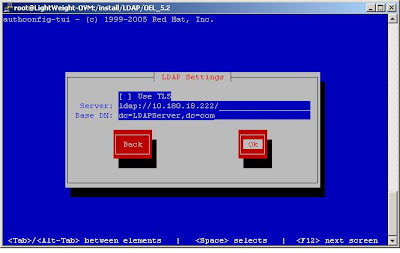
Make sure You have not selected to use TLS .
Mention Your LDAP server IP address and Base DN according to your LDAP Server.
Once the necessary changes made your ldap.conf file will be modified accordingly .You can confirm the changes using .
# cat /etc/openldap/ldap.conf## LDAP Defaults## See ldap.conf(5) for details# This file should be world readable but not world writable.#BASE dc=example, dc=com#URI ldap://ldap.example.com ldap://ldap-master.example.com:666#SIZELIMIT 12#TIMELIMIT 15#DEREF neverURI ldap://10.180.18.222/BASE dc=LDAPServer,dc=comTLS_CACERTDIR /etc/openldap/cacerts3.2>Modify /etc/nsswitch.confBefore modifying the file lets understand why would we need to modify the file?
Since the client is referring to LDAP server for login credentials its necessary to set the priority.
By setting the priority for example look at the below entry from my nsswitch.conf file.
passwd: files ldap shadow: files ldap group: files ldap
the first priority is files means whenever any attempt to log in take place the first local /etc/passwd ,/etc/shadow,/etc/group files are referred if the user is not available in these files then LDAP server is contacted.
You can change these behavior by changing the order you may also eliminate the need of local authentication.
Make the necessary changes according to your requirement or stick with mine.
You can check the LDAP server users using following command @ client's end.
Note helpdesk user is getting displayed.You can login with helpdesk user on client even if it doesnt exists in clients /etc/passwd file.
# ldapsearch -x# extended LDIF## LDAPv3# base <> with scope subtree# filter: (objectclass=*)# requesting: ALL## LDAPServer.comdn: dc=LDAPServer,dc=comdc: LDAPServerobjectClass: topobjectClass: domain# Hosts, LDAPServer.comdn: ou=Hosts,dc=LDAPServer,dc=comou: HostsobjectClass: topobjectClass: organizationalUnit# Rpc, LDAPServer.comdn: ou=Rpc,dc=LDAPServer,dc=comou: RpcobjectClass: topobjectClass: organizationalUnit# Services, LDAPServer.comdn: ou=Services,dc=LDAPServer,dc=comou: ServicesobjectClass: topobjectClass: organizationalUnit# netgroup.byuser, LDAPServer.comdn: nisMapName=netgroup.byuser,dc=LDAPServer,dc=comnisMapName: netgroup.byuserobjectClass: topobjectClass: nisMap# Mounts, LDAPServer.comdn: ou=Mounts,dc=LDAPServer,dc=comou: MountsobjectClass: topobjectClass: organizationalUnit# Networks, LDAPServer.comdn: ou=Networks,dc=LDAPServer,dc=comou: NetworksobjectClass: topobjectClass: organizationalUnit# People, LDAPServer.comdn: ou=People,dc=LDAPServer,dc=comou: PeopleobjectClass: topobjectClass: organizationalUnit# Group, LDAPServer.comdn: ou=Group,dc=LDAPServer,dc=comou: GroupobjectClass: topobjectClass: organizationalUnit# Netgroup, LDAPServer.comdn: ou=Netgroup,dc=LDAPServer,dc=comou: NetgroupobjectClass: topobjectClass: organizationalUnit# Protocols, LDAPServer.comdn: ou=Protocols,dc=LDAPServer,dc=comou: ProtocolsobjectClass: topobjectClass: organizationalUnit# Aliases, LDAPServer.comdn: ou=Aliases,dc=LDAPServer,dc=comou: AliasesobjectClass: topobjectClass: organizationalUnit# netgroup.byhost, LDAPServer.comdn: nisMapName=netgroup.byhost,dc=LDAPServer,dc=comnisMapName: netgroup.byhostobjectClass: topobjectClass: nisMap# helpdesk, People, LDAPServer.comdn: uid=helpdesk,ou=People,dc=LDAPServer,dc=comuid: helpdeskcn: helpdeskobjectClass: accountobjectClass: posixAccountobjectClass: topobjectClass: shadowAccountuserPassword:: e2NyeXB0fSQxJDdkZDZoNW5qJFZSNWU4aS9lNm1kaEM3eGEzTzdjQjE=shadowLastChange: 14930shadowMax: 99999shadowWarning: 7loginShell: /bin/bashuidNumber: 504gidNumber: 505homeDirectory: /home/helpdesk# search resultsearch: 2result: 0 Success# numResponses: 15# numEntries: 14

